Autumn Morning in Tsukahara

Autumn Morning in Tsukahara
Autumn morning in Tsukahara

Monday, September 29, 2014

Fun Time with the Dogs

We took a day off this weekend to spend some fun time with the dogs. We went to a beach in Higi and to a park in Beppu. The dogs loved it! We had the beach in Higi all to ourselves.


Lucky is making sure the beach is clear of any debris. He loves barking at the waves.


Kiley can still run fast for a dog that's almost ten.
 
The palm trees reminded me of California
 
 
The beach park in Beppu is huge, but there wasn’t much sand to play in for the dogs. It was a good place to meet other dogs and to go for a long walk. It was a nice break from the household chores and I think we'll do this again in the near future.    George


Tuesday, September 16, 2014

Door and Rot Update


Just a quick update…the door has been repaired, refinished and reinstalled. The stonework around the door came with the house. I’m going to change the color of the grout to blend in with the stone. That project will have to wait until I start tiling our new floors.
 
The rot repair is almost complete. The damage has been removed and the surface has been treated with Shell Guard and filled with epoxy. The epoxy clay is easy to mix and apply. A couple of coats of sealer and stain will finish up the job.
 
 
I’ve been busy removing oxidation from the logs and paneling in the former garage. The area will be renovated and turned into a downstairs master bedroom. The master bedroom on the second floor will be used as a guest bedroom. Erika and I believe that when we get older, climbing the stairs will become difficult. Relocating the master bedroom will solve that problem.   George


Tuesday, September 9, 2014

Cleaning the wood stove and pipe...it's fun!

 
The clear plastic tarp(included) taped to the front of the stove is not pictured.
 
During my previous trip to the states, I purchased a really cool product that is used to clean a wood stovepipe. Instead of climbing a ladder (30 feet) to clean the pipe, the stovepipe can be cleaned from the front of the woodstove. Not only is this a safer method to clean, it’s less messy. Interested? Take a look…
 
Spinning whip trimmed to fit a six inch diameter pipe
The spinning whip is trimmed to fit the stove pipe. The 3 foot sections of rod are snapped together to achieve the desired length. The whole thing is slowly inserted into the stovepipe. When it reaches the top, connect the assembly to a drill motor.
 
Drill motor adapter is included
 
Vacuum, drill motor, light
 
Before turning the drill motor on, tape a plastic tarp to the front opening of the stove and feed the tube through the tarp. Insert a vacuum hose into the stove opening to catch any dust that may fall down the pipe. Turn  the vacuum on. Turn the drill motor on and use an up and down motion to remove any creosote. 
 
Keep the bend in the rods gradual.
 
It was a good idea to cushion the sharp metal edge from damaging the plastic rods.
 
To clean a 24 foot section of pipe took about 10 minutes. The hardest part of the whole procedure was removing each 3 foot section of cleaning rod. The snaps require a little effort to unlock. This is important because you don’t want the sections to come apart inside the chimney. Continue cleaning and removing the rods until you reach the bottom. Turn off the vacuum, remove the tarp, and be amazed at how clean your stovepipe is. It’s really that easy!
The darker material is creosote
 
 
The tool works well even if there are bends in the stovepipe. Just make sure to keep the bends gradual. Any sharp bends can break the rods.


I waited almost 3 years to clean our stovepipe. It was so easy to do (and fun), I might clean the stove every year.      George


Thursday, September 4, 2014

Constructing the Telescope Pier


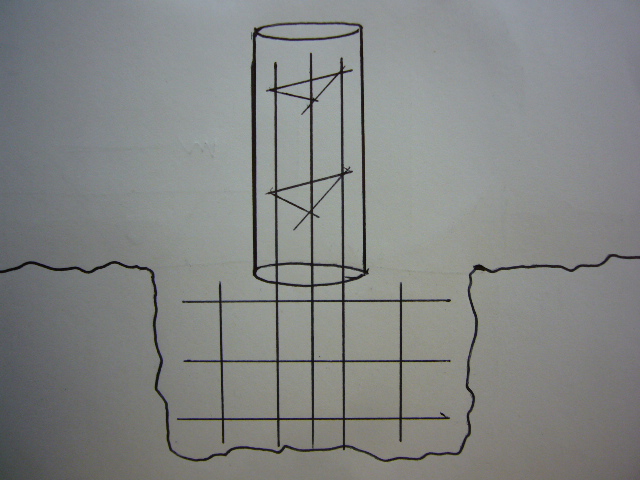
          Here’s a drawing I found on the internet. It’s close to what I’m trying to build. The 3’x 3’x 27” block will require about 1222 kgs. of concrete and the tube will require about 166 kgs of concrete. The total is about .70 cubic meters. If I could, I would pour the footing then wait an hour before pouring the pier. This would prevent the concrete in the tube from sagging. The concrete is coming from Yunohira (closest vendor) which is about 45 minutes away. Figuring about an hour to deliver, I’m calculating I have about 1.5 hours to do both pours. If we pour the footing in 15 minutes and then wait 1 hour, then I have 15 minutes to hand shovel and tamp 166 kgs (six 80lbs bags) into the tube…not much time. Adding to the difficulty, I have to accurately align a pier plate in the concrete with true north once the tube is almost filled, finished and leveled.
 
          Why not just mix the concrete yourself? I would if the materials were available. I can’t find a supplier for a large quantity of bags of premixed concrete. The bags that are available are only 10 kgs at about 1000 yen a bag. The bags would require gravel to be added to strengthen the mix. The cost would be close to 120000 ($1200) yen. Having the concrete premixed and delivered only cost around 16000 ($160)…big difference! The weather will play a huge factor in the curing process. The pour will have to wait until the weather is cool and dry…maybe in October.    George


Monday, September 1, 2014

Watermelons, Door and Rot Repair


Here are some pictures of the watermelons from Erika’s garden. They aren’t the largest melons, but they are delicious.


On another note, the front door has been needing a makeover for some time. Over the years, the joints have shrunk and separated. The door has become impossible to open and close. I took the door off its hinges and removed all of the hardware. I removed surface rust from the hinges and painted all of the door hardware a satin black. The black hardware blends in well with the mission-style motif we are trying to create in our home…more on that later. The door is solid and heavy. Erika and I carefully placed the door in the bed of the k-truck. BTW, the truck bed makes an excellent portable workbench. Unlike the pickup trucks in the states, three of the sides fold down.


I removed most of the oxidation from the wood and glued the joints. Pipe clamps were used to hold everything together. I also added some long stainless steel screws to secure the joints. The screw heads were concealed with epoxy putty and stained to match. After the glue cured, I reinstalled the door to determine what needed to be trimmed and shimmed. The door required about 1/8” of material to be removed with a skillsaw. Once everything fitted properly, the door was stained to match the exterior logs. The front door assembly consists of a side window door which needed to be adjusted and refinished. In all, the project took about two full days. At a later time, we will make a stained glass for the window door. I drew up a design right after we purchased the house. I can’t wait to get that project started.


On another note, I continued staining the logs on the front of the house. I preferred to start at the top of the house and work my way down. Unfortunately, I don’t have the scaffold to accomplish this. To continue making progress, I decided to start on the bottom and work my way up. I know this will be a problem at a later time. Power washing the eaves will make a huge mess on the newly stained logs. Stain and paint drippings will add to the problems. I’ll have to cover the logs with tarps and hope for the best.
 
While staining the lower logs, I encountered some severe rot on one of the vertical supporting beams. I knew that the rot existed before we purchased the house. I was glad to be finally taking care of it. The rot had eaten away about a quarter of the diameter of the log. I removed the rotted areas and was relieved to find that I could shape the area to form a flat surface. Imagine turning a round log into a square. The flat surface was treated with an insect and rot preventative and then stained. I’ll have photos of the completed project in a later post.

I’m into the third year of the remodel and I still have a very long way to go.        George